Are you setting up your Salesforce integration with Five9 and outboundANI? Spigots can help you initialize the outboundANI ‘phone’ field on your Five9 Contacts as Leads come into Salesforce and sync over to Five9 via List Sync Plus 2.
Data Flow — how this process works
- A Five9 List item is created and Sync Status is ‘Verified’
- A Spigot takes in this List Item, and calls out out to the outboundANI API
- The Spigot then calls out to the Five9 API, setting your outboundANI ‘phone’ contact field to the Phone number provided by outboundANI
- The Spigot writes back to the List Item, recording that the initialization is complete
- Because the write back, this List Item no longer qualifies to enter the Spigot.
Configuration Steps — steps to complete
- Install Spigots Into Salesforce
- Install Five9 and List Sync Plus 2
- Add New Fields to ‘Five9 List Item’
- Create a Named Credential for Five9 API Callouts
- Create a Remote Site Setting for outboundIQ
- Create a New Spigot Called ‘Sync Outbound ANI To Five9’
- Monitor List Items, Logs, and Spigot Change Map
- Extra Considerations In Five9
- Final Thoughts
1. Install Spigots Into Salesforce
If you haven’t already, follow the steps here to get Spigots installed into your Sandbox or Production Salesforce org.
2. Install Five9 and List Sync Plus 2 in Salesforce
You should also have List Sync Plus 2 Installed, more info here.
You will also need a field on Lead that contains the Lead’s phone number, with a format of ‘+1’ and then 10 numeric digits (ex: ‘+12345678910’). In this tutorial, that fields is called ‘Five9 Phone’ (Lead.Five9_Phone__c).
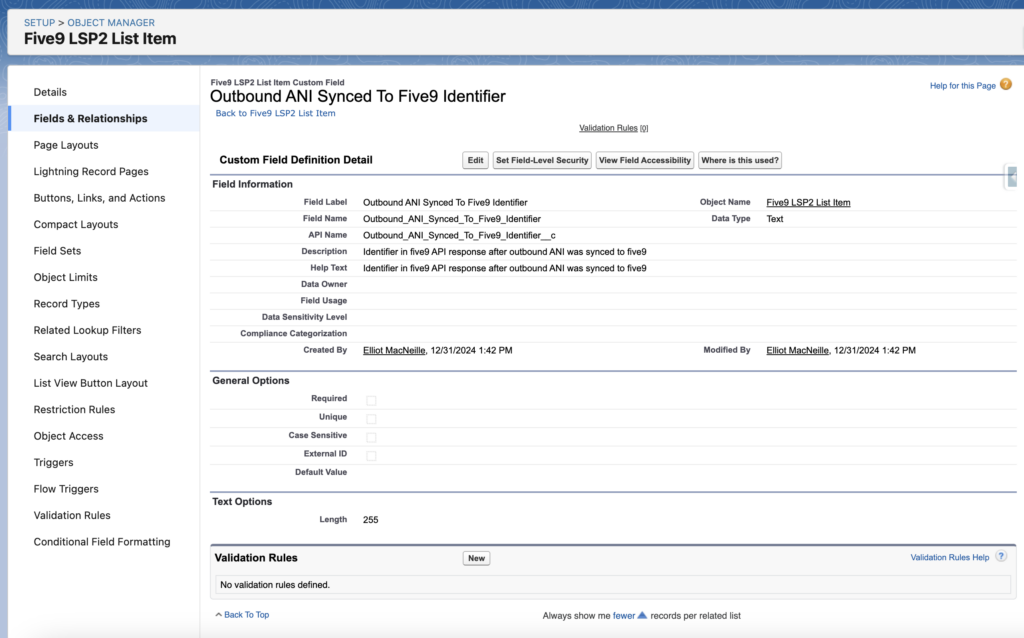
3. Add New Fields to ‘Five9 List Item’
Fields to add to ‘Five9 List Item’ (five9_lsp2__Five9_List_Item__c):
- Label = ‘Outbound ANI’
- API Name = ‘Outbound_ANI__c’
- Type = Text, 255 characters in length
- The running user of Spigots will need Write and Read access via FLS
- Label = ‘Outbound ANI Synced To Five9 Identifier’
- API Name = ‘Outbound_ANI_Synced_To_Five9_Identifier__c’
- Type = Text, 255 characters in length
- The running user of Spigots will need Write and Read access via FLS
4. Create a Named Credential for Five9 API Callouts
You will need the username and password of the user you are using to make API calls to Five9 from Salesforce (or any API enabled Five9 user).
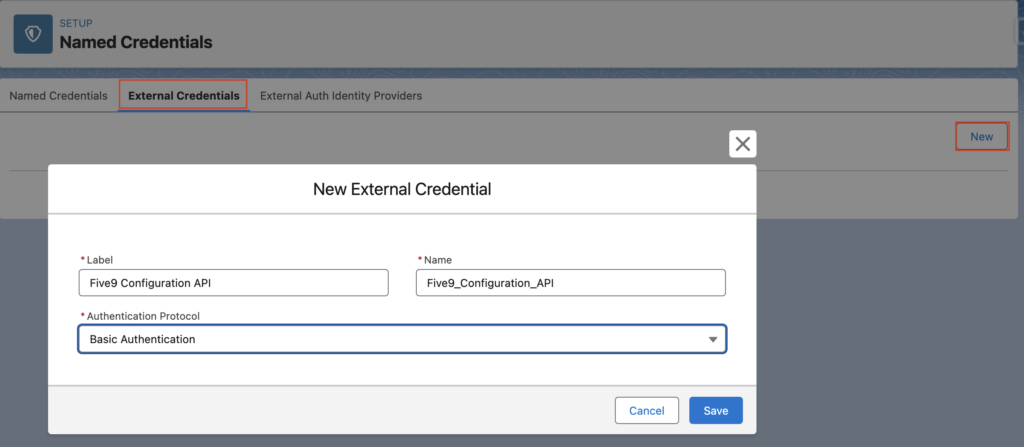
In Salesforce, go to ‘Setup’ -> ‘Named Credentials’, go to the ‘External Credentials’ and hit ‘New’ in the upper right.
Create an External Credential:
- Label = ‘Five9 Configuration API’
- Name = ‘Five9_Configuration_API’
- Authentication Protocol = ‘Basic Authentication’
Scroll down to ‘Principals’ and click ‘New’ to create a Principal:
- Identity Type = ‘Named Principal’
- Username = ‘<YOUR_FIVE9_API_USER_USERNAME>’
- Password = ‘<YOUR_FIVE9_API_USER_PASSWORD>’
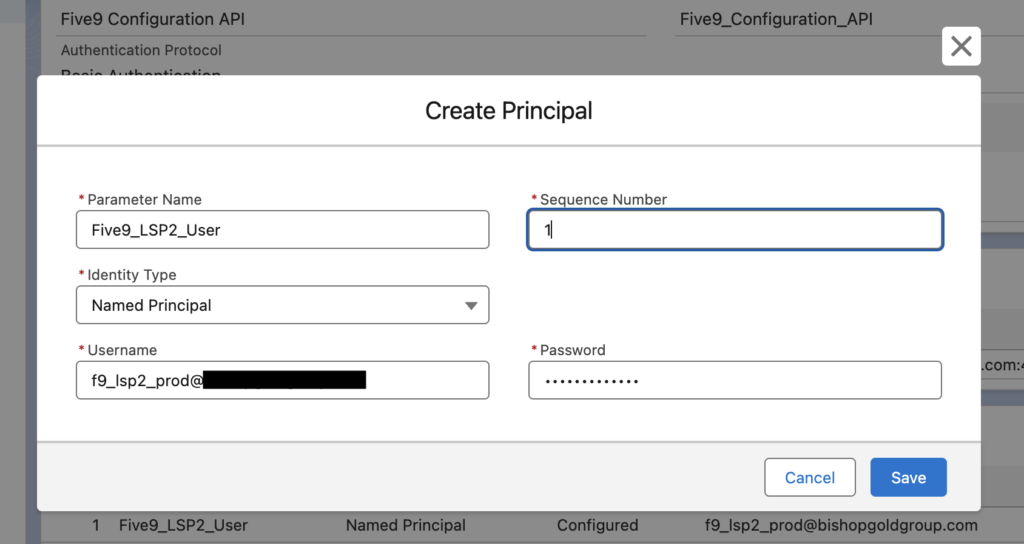
You external credential should look like this
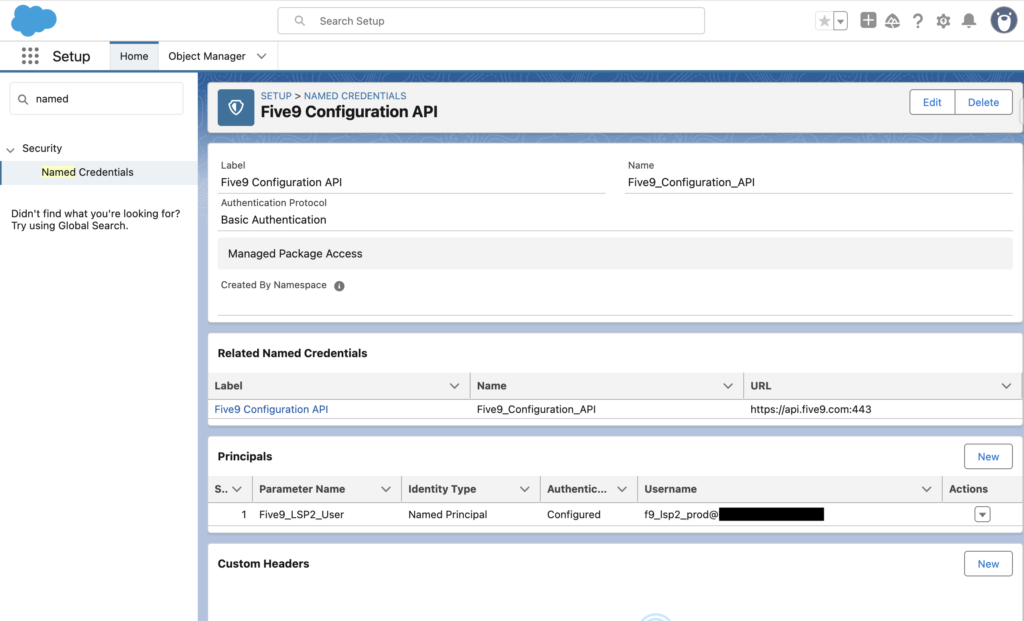
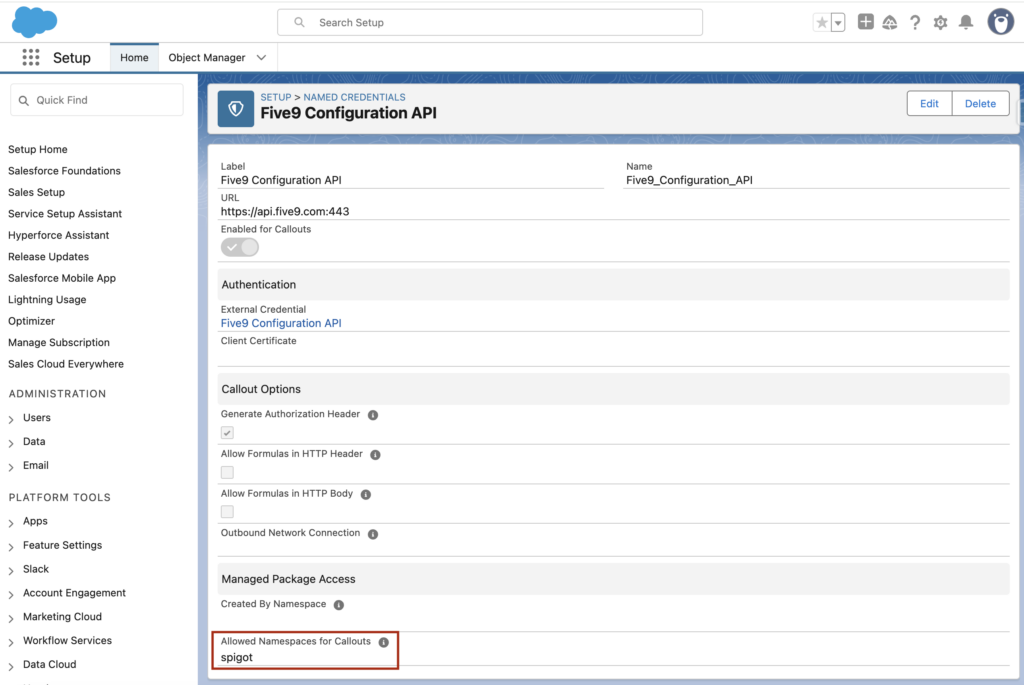
Then, go to the ‘Named Credential’ tab. Your Named Credential should should look like this:
- URL = ‘https://api.five9.com:443’
- External Credential = ‘Five9 Configuration API’ (created above)
- Allowed Namespaces for Callouts = ‘spigot’
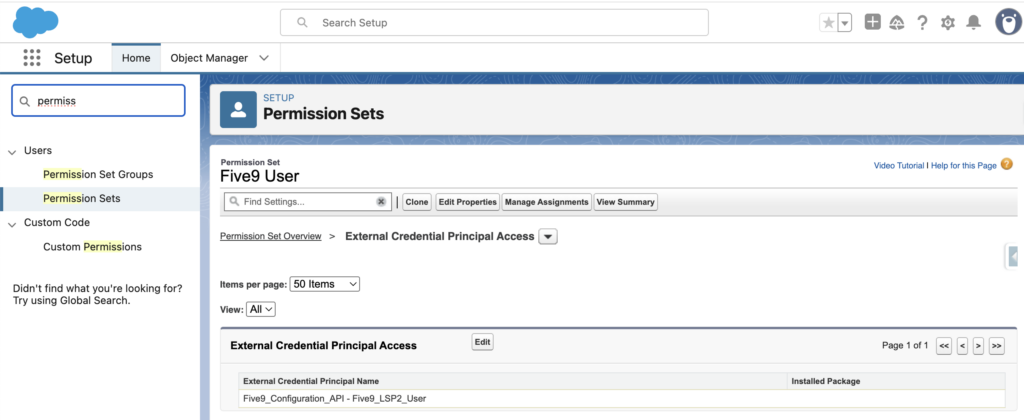
Finally, grant access to the running User of Spigots ‘External Credential Principal Access’ via a Permission Set:
5. Create a Remote Site Setting For outboundIQ
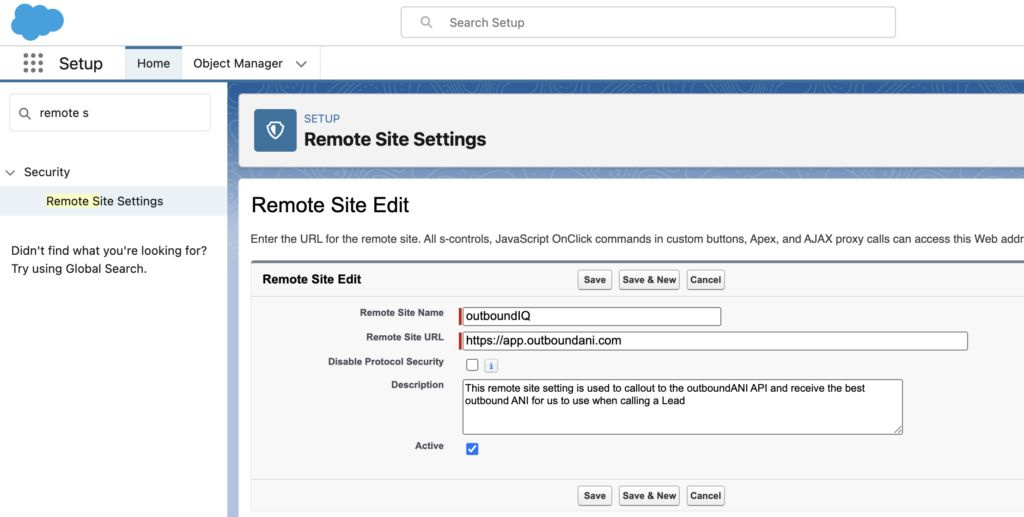
You could use a Named Credential for callouts to outboundIQ, but in this tutorial, we are calling out to outboundIQ without one. Without a Named Credential, we will need to add a Remote Site Setting to allow callouts. You can go to ‘Setup’ -> ‘Remote Site Settings’ and click ‘New Remote Site Setting’.
The Remote Site Setting can look like this:
- Name = ‘outboundIQ’
- Remote Site URL = ‘https://app.outboundani.com‘
- Active = true
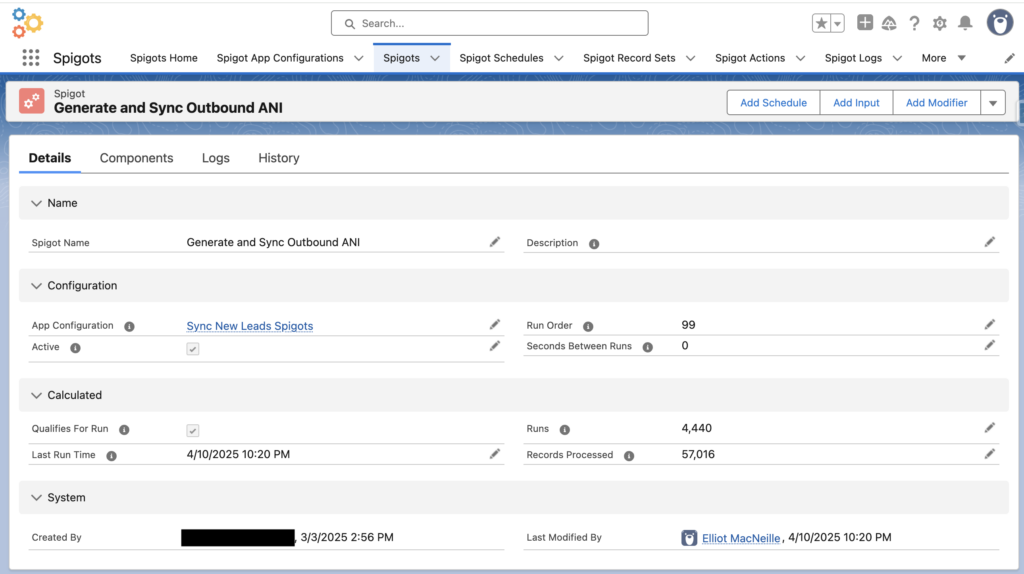
6. Create a New Spigot Called ‘Sync Outbound ANI To Five9’
The Spigot Details can look something like this:
The Spigot’s components should look like this. Notice there are three actions. Run Order of the Spigot Actions matters here!
- First we callout to outboundANI
- Then we callout to Five9
- Finally, we write back data from the API responses to the ‘Five9 List Item’ record in Salesforce
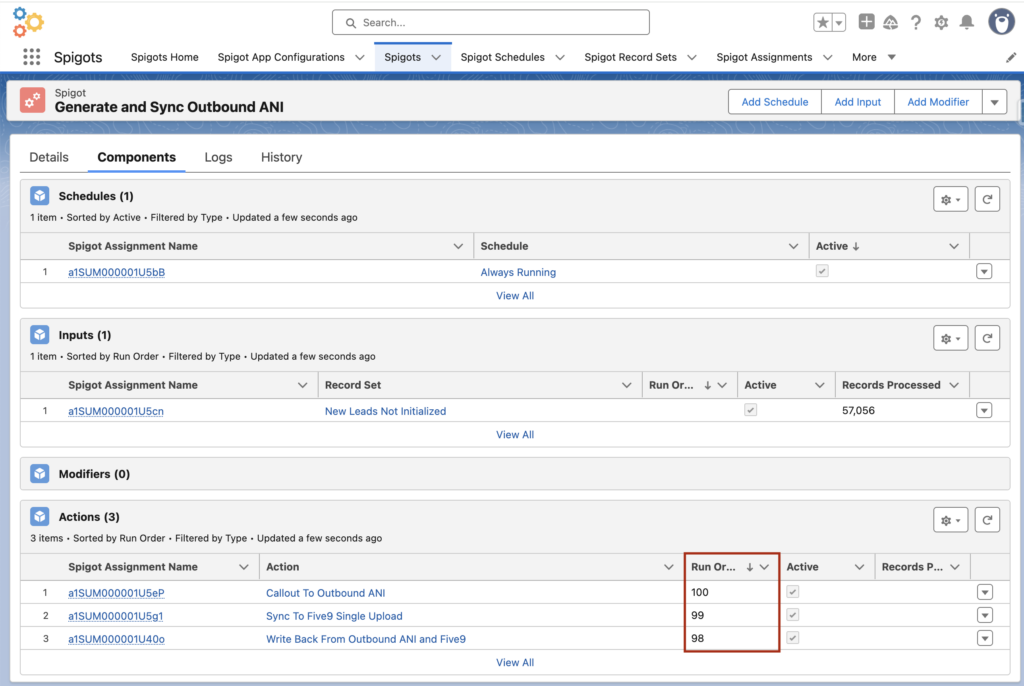
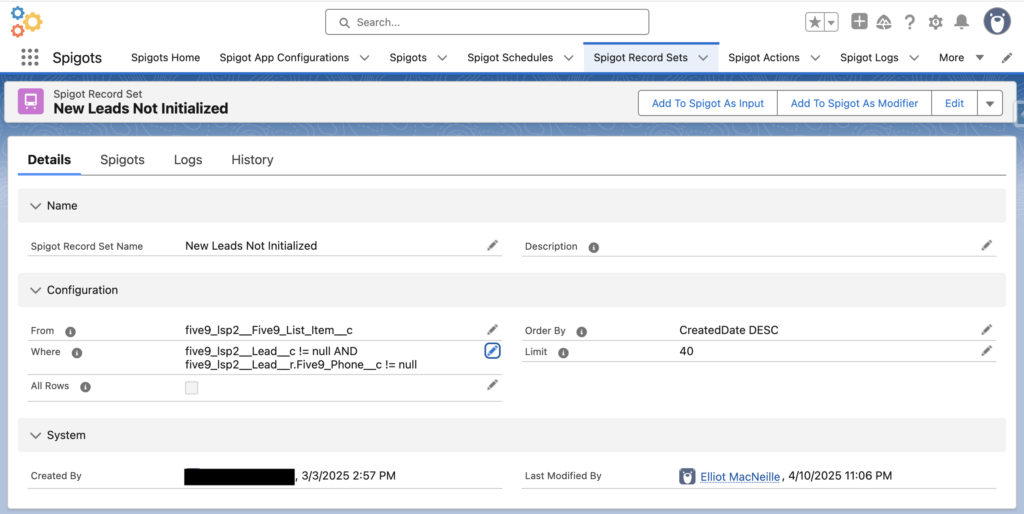
The Spigot Input can look like this:
- Name = ‘New Leads Not Initialized’
- From = ‘five9_lsp2__Five9_List_Item__c’
- Where = ‘five9_lsp2__Sync_Status__c = ‘Verified’ AND five9_lsp2__Lead__c != null AND five9_lsp2_Lead__r.Five9_Phone__c != null’
- Five9_Phone__c is a field on Lead that contains the Lead’s phone number formatted as ‘+1’ and 10 numeric digits (ex: ‘+12345678910’)
- Order By = ‘CreatedDate DESC’
- Note: this will initialize the Newest leads to sync to Five9 first
- Limit = 40
- Note: This needs to avoid the Salesforce transaction limit of 100 callouts. Consider there will be 2 callouts per Input record, hence it is less than 50.
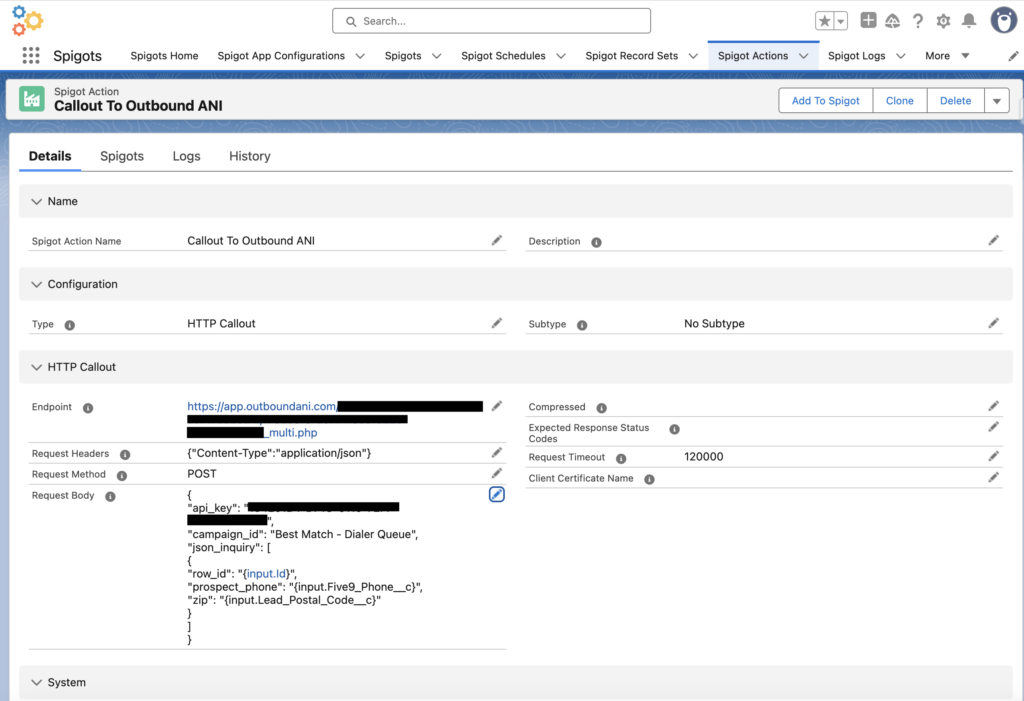
The Spigot’s First Action can look like this:
- Name = Callout To Outbound ANI’
- Type = ‘HTTP Callout’
- Subtype = ‘No Subtype’
- Endpoint = ‘https://app.outboundani.com/<OUTBOUND_ANI_UNIQUE_ID>_multi.php
- Request Headers = ‘{“Content-Type” : “application/json”}’
- Request Method = ‘POST’
- Request Timeout = 120000
- Request Body = ‘{
“api_key”: “<YOUR_OUTBOUND_ANI_API_KEY>”,
“campaign_id”: “<ANY_FIVE9_OUTBOUND_CAMPAIGN>”,
“json_inquiry”: [
{
“row_id”: “{input.Id}”,
“prospect_phone”: “{input.five9_lsp2__Lead__r.Five9_Phone__c}”,
“zip”: “{input.five9_lsp2__Lead__r.PostalCode}”
}
]
}’- Note, you must fill in:
- <OUTBOUND_ANI_UNIQUE_ID>
- <ANY_FIVE9_OUTBOUND_CAMPAIGN>
- <YOUR_OUTBOUND_ANI_API_KEY>
- Note, you must fill in:
Your Outbound ANI API Key can be gotten here. To get your unique API endpoint, click ‘View Post Specs’:
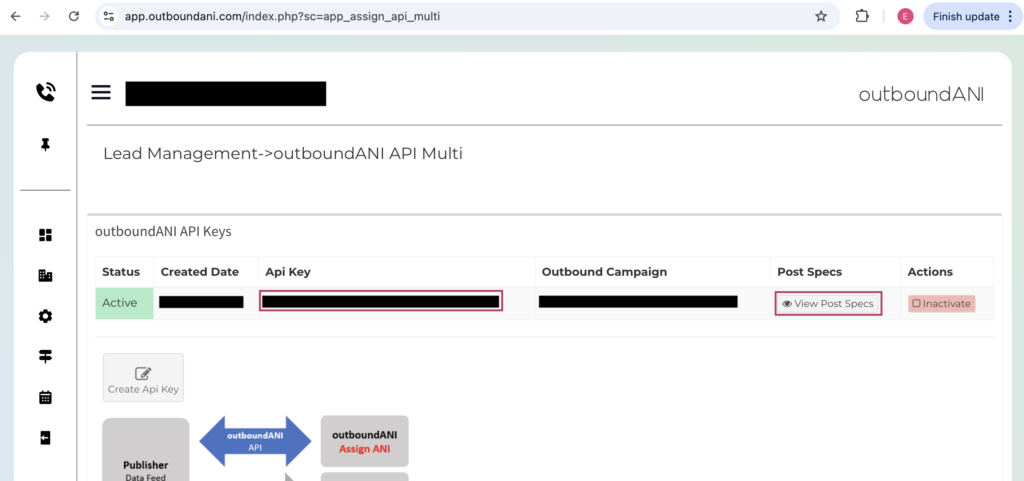
Within the Post Specs, you’ll see your unique ‘Posting URL’ as highlighted below:

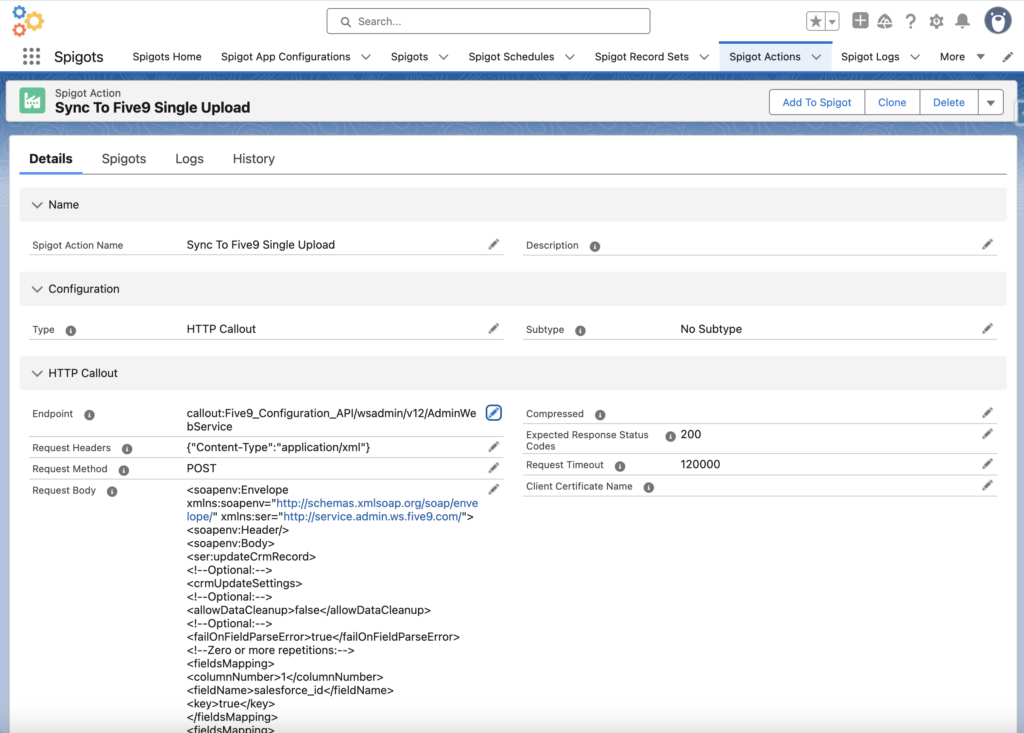
Your second Spigot Action can look like this:
- Name = ‘Sync To Five9 Single Upload’
- Type = ‘HTTP Callout’
- Subtype = ‘No Subtype’
- Endpoint = ‘callout:Five9_Configuration_API/wsadmin/v12/AdminWebService’
- Request Headers = ‘{“Content-Type” : “application/xml”}’
- Request Method = ‘POST’
- Request Timeout = 120000
- Request Body = ‘<soapenv:Envelope xmlns:soapenv=”http://schemas.xmlsoap.org/soap/envelope/” xmlns:ser=”http://service.admin.ws.five9.com/“>
<soapenv:Header/>
<soapenv:Body>
<ser:updateCrmRecord>
<crmUpdateSettings>
<allowDataCleanup>false</allowDataCleanup>
<failOnFieldParseError>true</failOnFieldParseError>
<fieldsMapping>
<columnNumber>1</columnNumber>
<fieldName>salesforce_id</fieldName>
<key>true</key>
</fieldsMapping>
<fieldsMapping>
<columnNumber>2</columnNumber>
<fieldName><YOUR_OUTBOUND_ANI_FIVE9_PHONE_FIELD></fieldName>
<key>false</key>
</fieldsMapping>
<crmAddMode>DONT_ADD</crmAddMode>
<crmUpdateMode>UPDATE_FIRST</crmUpdateMode>
</crmUpdateSettings>
<record>
<fields>{input.five9_lsp2__Lead__c}</field>. <fields>+1{change_map.actions.<OUTBOUND_ANI_CALLOUT_ACTION_ASSIGNMENT_SALESFORCE_ID>.response.Response_Body__c:json.[0].outboundani}</fields>
</record>
</ser:updateCrmRecord>
</soapenv:Body>
</soapenv:Envelope>’
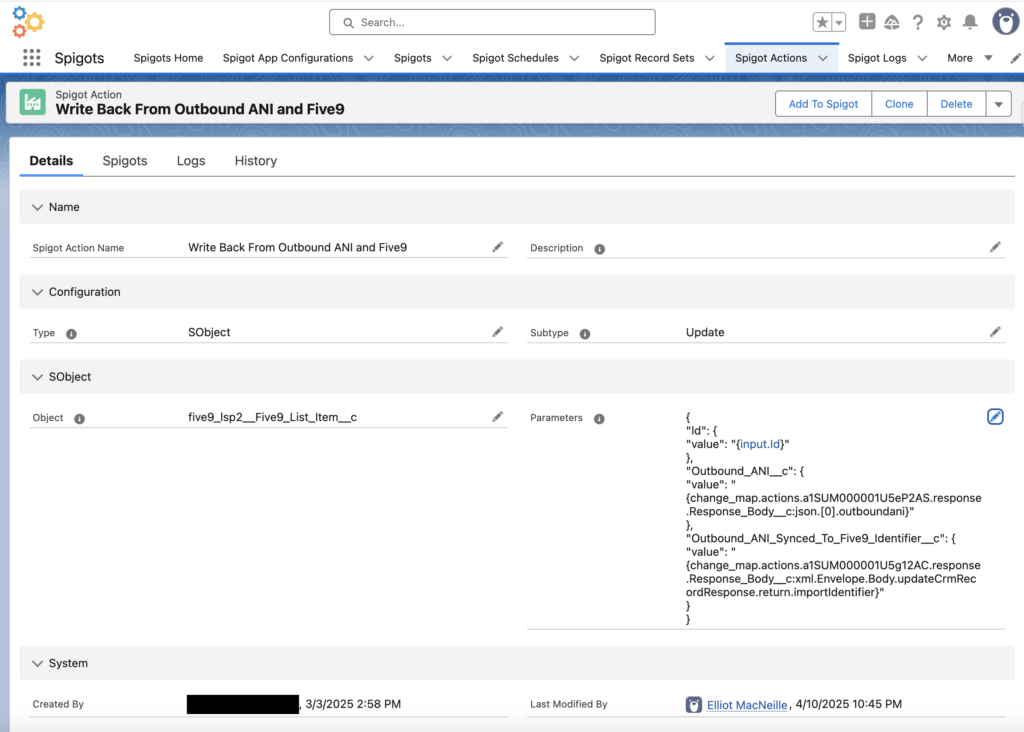
Your third Spigot Action can look like this:
- Name = ‘Write Back From Outbound ANI and Five9’
- Type = ‘SObject’
- Subtype = ‘Update’
- Object = ‘five9_lsp2__Five9_List_Item__c’
- Parameters = ‘{
“Id”: {
“value”: “{input.Id}”
},
“Outbound_ANI__c”: {
“value”: “{change_map.actions.<OUTBOUND_ANI_CALLOUT_ACTION_ASSIGNMENT_SALESFORCE_ID>.response.Response_Body__c:json.[0].outboundani}”
},
“Outbound_ANI_Synced_To_Five9_Identifier__c”: {
“value”: “{change_map.actions.<FIVE9_CALLOUT_ACTION_ASSIGNMENT_SALESFORCE_ID>.response.Response_Body__c:xml.Envelope.Body.updateCrmRecordResponse.return.importIdentifier}”
}
}’- Note, you must fill in:
- <OUTBOUND_ANI_CALLOUT_ACTION_ASSIGNMENT_SALESFORCE_ID>
- <FIVE9_CALLOUT_ACTION_ASSIGNMENT_SALESFORCE_ID>
- Note, you must fill in:
7. Monitor List Items, Logs, And Spigot Change Map
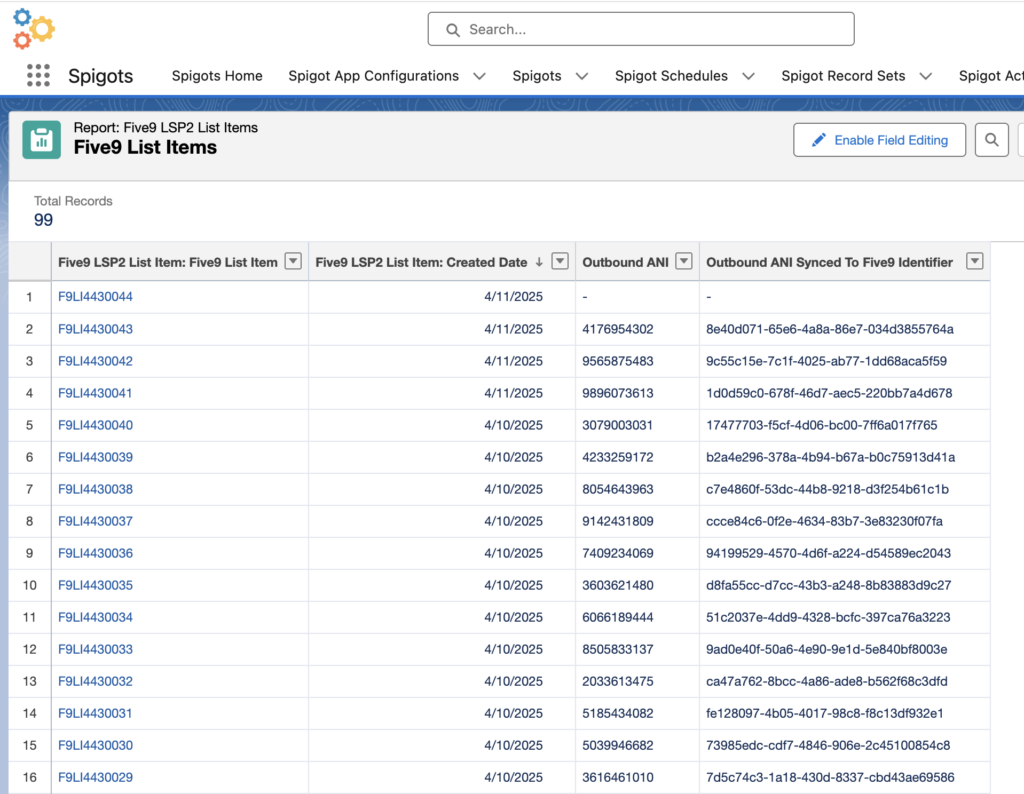
Once the Spigot is running correctly, you should be able to see a report of ‘Five9 List Items’ that looks like this.
Notice that the field ‘Outbound ANI’ and ‘Outbound ANI Synced to Five9 Identifier’ are filled for all but the most recently created ‘Five9 List Item’? The most recently created List Item hasn’t had a chance to run through the Spigot yet, but other List Items that passed through had API Response values written to them as expected.
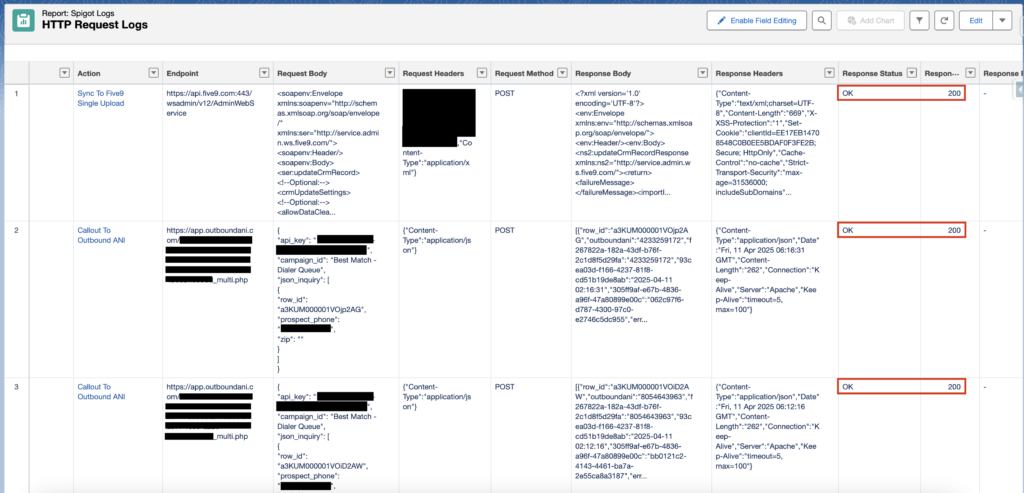
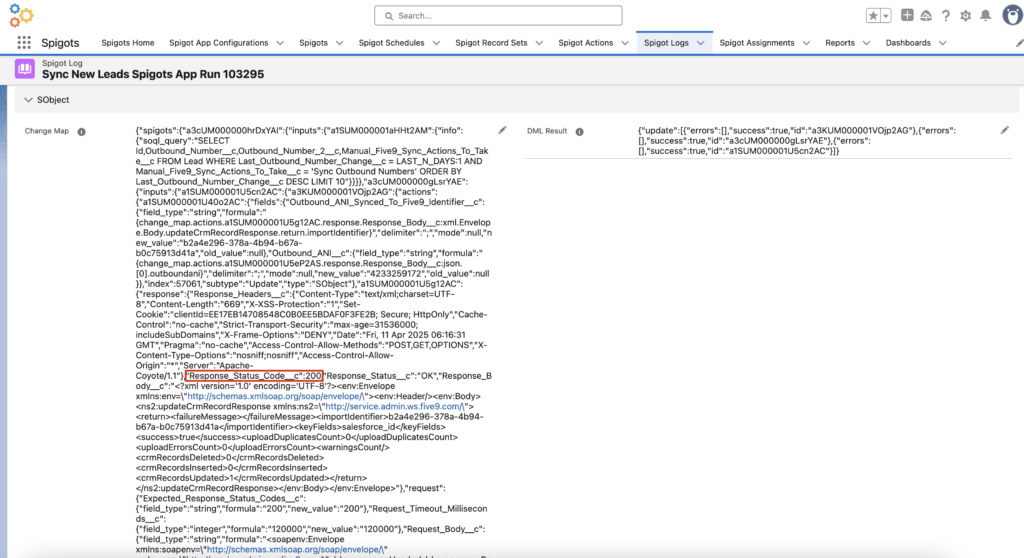
Every callout in Spigots results in a Spigot Log of Type ‘HTTP Request’ being created. We can monitor these to understand what is being requested, and what is received in our API calls, including response status and response body. Check the pre-built report called ‘HTTP Request Logs’ in the Folder ‘Spigot Reports’ for an example Report.
Here you can see we are getting healthy 200 Response Codes from both outboundANI and Five9 API calls.
A Spigot Log of Type ‘App Run’ is generated with every run of a Spigot App Configuration. These can be seen within the ‘App Runs’ tab of the ‘Spigot App Configuration’ Record Page:
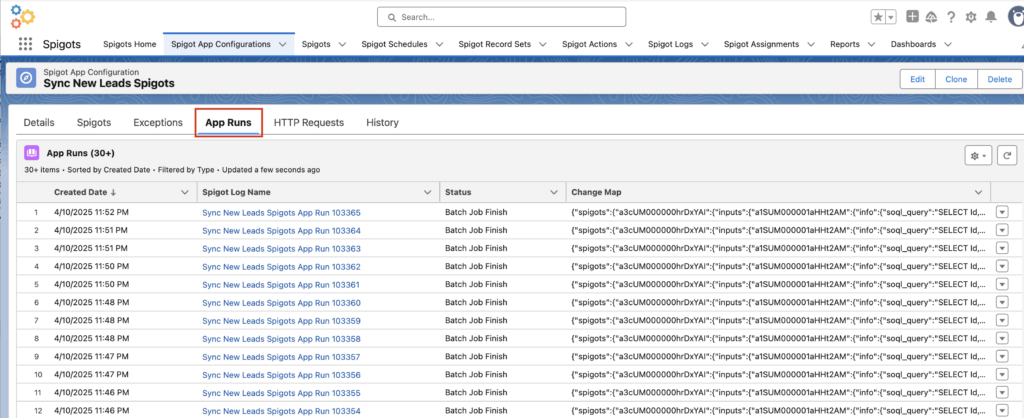
You can see lots of information in the App Run’s Change Map, such as the rendering of Spigot Action Formulas, which can help debug why something might not be working as intended.
8. Extra Considerations In Five9
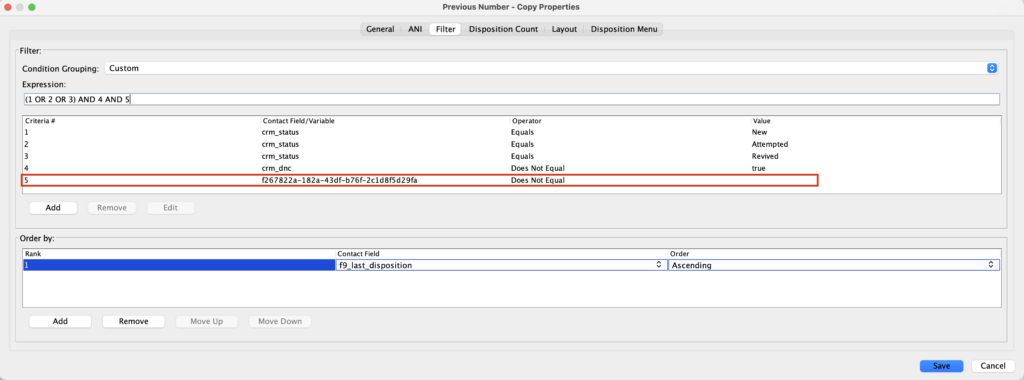
In Five9, you will want to be using Campaign Profiles, so you can set your autodialer campaigns to use your Outbound ANI phone field as the ANI.

In the Campaign Profile Filter, I recommend requiring your outboundANI phone field is not NULL. This means that the Five9 Campaign will wait until the Five9 Contact field is initialized before dialing the Contact record.
Otherwise the Five9 contact could get dialed after the Five9 Contact is created, but before the outboundANI phone field is initialized. Such a call would come from your domain’s default ANI, and not the ANI auto-rotated through your outboundANI integration.
9. Final Thoughts
I’d love to hear how this guide worked for you, and if you have any ideas for improvements or additional relevant information. Please feel free to reach out to elliot@spigots.app with any feedback.
Leave a Reply